Upgrading the factory halogen headlights on your Jeep Wrangler JL to modern LEDs is one of the most rewarding and transformative modifications you can perform. It dramatically improves nighttime visibility, enhances safety, and gives your Jeep a more aggressive, contemporary look. While the process is straightforward and designed to be user-friendly, following a careful, step-by-step approach ensures a perfect, error-free installation. This guide will walk you through the entire process, from preparation to final alignment, for installing a complete plug-and-play Jeep LED headlight assembly.
Preparation: Tools and Pre-Installation ChecksBefore you begin, gather your tools and new components. You will need a basic set of socket wrenches (typically 10mm and 13mm), a Torx T15 bit (for some trim pieces), a flathead screwdriver for prying, and protective gloves. Most critically, ensure you have purchased a complete LED headlight assembly specifically designed for the Jeep Wrangler JL (2018-present). These are true plug-and-play units, not just LED bulbs for the stock housing. Unbox your new lights and verify all components are present: the left and right assemblies, wiring harnesses, and any included anti-flicker modules or adapters. It is highly recommended to perform this installation in a well-lit garage or during daylight hours. Before removing any parts, disconnect the negative terminal of your Jeep's battery to prevent any electrical shorts or accidental airbag deployment.
Step 1: Removing the Factory Headlights and GrilleThe JL’s design requires partial removal of the front grille for proper access. Start by using your flathead screwdriver (wrapped in tape to avoid scratches) to carefully pop off the small, rectangular trim covers located on the top edge of the front bumper, on either side of the grille. Behind these covers are two 10mm bolts; remove them. Next, locate the Torx T15 screws along the top edge of the grille (under the hood) and remove them. The grille is now held by plastic clips. Firmly but evenly pull the entire grille assembly straight forward from the top until it releases. You do not need to disconnect the daytime running light (DRL) wire if present; simply rest the grille safely on the front bumper. With the grille out of the way, you can now access the three 13mm headlight retaining bolts. Remove these three bolts, and the factory halogen headlight assembly will pull straight forward. Disconnect the single weatherproof electrical plug by pressing the tab and pulling it apart, and remove the old light.
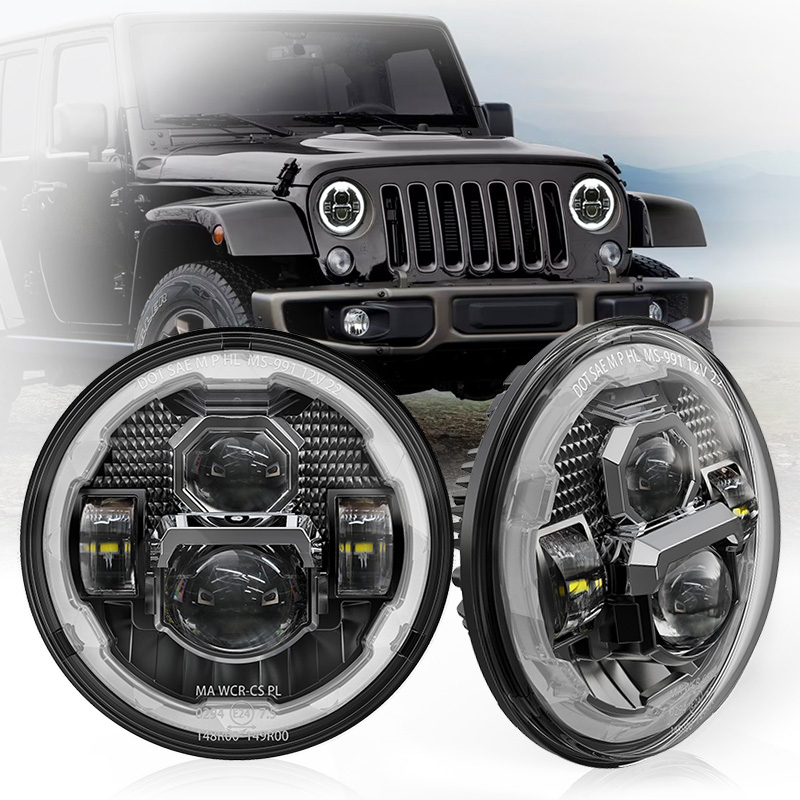
Step 2: Installing and Connecting the New LED AssembliesTake your new LED headlight assembly and first connect its electrical plug to the Jeep's factory wiring harness you just disconnected—you should hear a definitive click. Before securing it in place, test the light. Reconnect your Jeep's battery negative terminal temporarily. Turn on your headlights and parking lights to verify that all functions work correctly: low beam, high beam, and the signature DRL or halo (if equipped). Check for any error messages on the dash. If the lights flicker or cause an error, install the included anti-flicker harness or CAN Bus decoder as per the manufacturer's instructions. Once confirmed operational, disconnect the battery again. Carefully thread the wiring into the engine bay and gently push the new LED assembly into position, aligning the three mounting posts with the holes in the Jeep's body. Hand-tighten the three 13mm retaining bolts to secure the light—do not overtighten. Repeat this entire process for the other side.
Step 3: Reassembly and Critical Final AlignmentAfter both new LED headlights are securely mounted and connected, carefully reposition the front grille. Align its plastic clips with the corresponding holes on the body and firmly press it back into place until you hear all clips snap home. Reinstall the Torx T15 screws along the top and the two 10mm bolts behind the bumper trim covers, then snap those covers back on. Reconnect the vehicle battery. The final, non-negotiable step is aiming your new headlights. Park your Jeep on level ground facing a wall about 25 feet away. The LED projectors will have a sharp horizontal cutoff line in their beam pattern. Using the adjustment screws on the top and side of each assembly (accessible from under the hood), adjust the beam so this cutoff line is at or slightly below the height of the headlight's center from the ground. This ensures maximum road illumination without blinding oncoming traffic.
By following these steps, you have successfully installed a major upgrade that merges form and function. Your Wrangler JL now boasts superior illumination for safer adventures and a commanding modern presence, all achieved through a satisfying afternoon of hands-on work.